Monday, September 12, 2011
My Absence
I am sorry that I have not posted in the past week. My mother-in-law was killed by a falling tree during Hurricane Lee. We are just in shock and are trying to deal with the pain and questions we have. She was an amazing woman and will be missed more than words could ever express. I love her dearly. However, Adam and I know that the Lord had this situation in His hands, and He has a plan. We know that He uses all things for good for those who love Him (Romans 8:28). My husband, family, and I are trying to get back into the swing of work and "normal life." I will hopefully be back to posting as soon as we can get back on our feet. Thank you so much for your thoughts and prayers.

Monday, September 5, 2011
Quick and Easy Dessert!
Last night my brother and his girlfriend came over to hang out and watch a movie with Adam and me. They brought Inception. That movie is nuts. Whoever came up with that idea is crazy twisted. It was bizzare. Thankfully, my brother knows this movie inside and out and was able to keep me updated with what was going on. Otherwise, I would have been completely lost.
Before they headed over, I searched my cabinets for a sweet treat I could fix. I didn't want to make a huge mess, as we are trying to use our countertops lightly until we are sure the paint has had time to completely set. I didn't want to use the mixer because I would have to set it out on the counter, so I knew that wasn't an option. I remembered a recipe I had seen on Pinterest using crescent rolls. I took out a package of crescent rolls, opened, unrolled, and separated them. On 4 of the unbaked rolls, I spread peanut butter....and on top of the peanut butter I put chocolate chips!


Before they headed over, I searched my cabinets for a sweet treat I could fix. I didn't want to make a huge mess, as we are trying to use our countertops lightly until we are sure the paint has had time to completely set. I didn't want to use the mixer because I would have to set it out on the counter, so I knew that wasn't an option. I remembered a recipe I had seen on Pinterest using crescent rolls. I took out a package of crescent rolls, opened, unrolled, and separated them. On 4 of the unbaked rolls, I spread peanut butter....and on top of the peanut butter I put chocolate chips!

On the other 4 crescents I used Nutella. We LOVE Nutella. I really like it on toast. So good.

That looks kind of gross.....sorry.
Then I rolled them all up, and they were ready to go!

I put them in the oven at 350 degrees for 14 minutes (per regular crescent roll instructions). When they came out, I put a small bit of butter on eat one, and then got powdered sugar happy.
Oh yesssss.

I served them up on a plate with a cold glass of milk. They were delicious!

Thanks for reading! Happy Labor Day!
Saturday, September 3, 2011
How to Paint Your Countertop
I know this post has been long awaited! I have had many people ask me when I am going to post this, and I have a good excuse. It has taken this long to get it done! Yes, this has been a work in progress over the past few weeks. I will explain why below.
I have disliked the color of our countertops ever since we moved in the house. The color is hunter green. It's not a terrible color, it's just that I like to decorate light and bright, and this wasn't helping me.

I didn't think to take a "before" picture til we had piled everything up on the stove and bar stools. Of course, when thinking about painting the countertops, I did some pretty extensive research, cause that's how I roll. You can ask Adam. I research everything. So I finally landed on this product. I liked that it was made specifically for countertops and was just a one step process. Something I knew Adam couldn't argue with. :)


This time, Adam took his turn with the paint. Our sample section turned out very well, so he continued with the rest of the countertops. He just needed one coat to cover the green since the taupe was a bit darker. We really liked it! However.......as it dried, it took on a pinkish tint....almost like a salmon color. We were not happy. It would have looked SO good if it didn't have that tint. The color looks really good in these pictures. Trust me, if it looked like this in real life, I would have left it.


So, we of course returned this color as well. They gladly refunded our money, and we tried....another color. This time, we went with Canvas. It had a slight tanish greenish tint with a hint of yellow. I was thinking it would hopefully look...canvas.


I bet at this point you are starting to wonder how thick our countertops are. Probably a few more inches thicker than they were! So...back to Home Depot we go. The funny thing is, they still had our tinted Cobblestone on the shelf, but it was discounted since it had been used! Score! So we bought it back at a lower price. Half actually. So in the end, we actually got a reduced price for our paint. We were refunded each time we bought the paint, and then the last time we were able to buy it for half price. Sweet!
Now here's the kicker. After trying all of these colors, we decided......to go back with the Cobblestone! I know, I know, all that work to just go back to the original color. But if we hadn't tried all these colors, then you would not have known what they looked like. Right? See, it's all for the good of blogging. :) After 2 coats of Cobblestone, here is the final color!


I love the color! We still have the Frog Tape on and all that, so look for Part Two to see how it looks without the tape and with all the small appliances and goodies back on the countertop. I will also let you know how the paint is holding up. Thank you to those who eagerly waited for this post!
I have disliked the color of our countertops ever since we moved in the house. The color is hunter green. It's not a terrible color, it's just that I like to decorate light and bright, and this wasn't helping me.

 |
| You can read about Rustoleum Countertop Paint here. |
We bought ours at Home Depot. You can get it at Lowes too. You can only have it tinted to certain colors listed on the top of the box, but they have a fair amount to choose from, and most of the colors are neutral.

We decided to go with Cobblestone. I liked it because it had gray and tan tones to it, so I knew it should go with our wall color which is "Washed Khaki" by Behr. Before you begin, here are the materials you will need.
 |
| Frog Tape (regular paint tape does not do the job), a small roller with a smooth texture (not rough or semi smooth), a foam brush to do the back lip area (you can throw these away when finshed. They are about 70 cents.) a face mask (THIS IS A MUST!), a small paint tray, a paint stick to stir, and a paint can opener (not pictured). |
This paint has TERRIBLE fumes. DO NOT use if you are pregnant. Or if you have a baby in the house. Or if you are a person. Ok, just kidding, but the fumes are terrible. The fumes are not like your average paint fumes. These fumes have a very toxic smell. It will linger in the house for at least a week, so if you are having company over before then, you may want to wait. My husband and I had to actually go stay with my parents for a few days afterward. We just couldn't handle it. Or maybe we couldn't be around the fumes because....
Before I just started slapping on the paint, we taped off the countertops first, being sure to tape around the sink. This is a very important step and one you have to do carefully. It actually only took us 5 minutes to do.


After doing this, I was ready to get to work, but instead of just diving in, I decided to do a test section. My test section is actually taken up completely by our massive microwave, so if it looked bad it would be alright. I mainly just wanted to get a feel for how to paint with the product.
 |
| Ignore the trash, please. :) |
Ah, you're quick. No, I hadn't taped off yet, but I did! Then I carefully rolled my roller in the paint tray and got to work. I worked quickly, and I kept the roller going in the same direction. I didn't go left to right and then top to bottom. I stayed left to right. I also used the roller on the back lip, but not on the very tip top. I used the foam brush for that. I also used the foam brush to do the sides of the countertop. After the first coat, it looked like this.


No, I didn't panic. I knew it would take more than one coat for the lighter cobblestone to cover the darker green. So I let this dry for one hour, and then I added a second coat. Remember, it is better to do several very thin coats than one thick coat. You want a smooth, even, and thin finish.
 |
| 2 coats of cobblestone |
So by this point, I bet you notice 2 things.
1) There is a spot on the countertop that is not covering. We were puzzled by that too. The spot felt really smooth. We think since the microwave had been there, that must be where it gets really hot. It just didn't hold the paint.
2)The second thing you might notice, is that the countertop color is now very close to the wall color. The color did not turn out the color it was supposed to according to the box.
We were disappointed, but I was determined we would get our money back and choose a different color. So the next day, we drove to Home Depot (with pictures in our cell phones!) to show them what had happened. They were completely cool and gave us our money back, and we bought a new color to try. Afterall, there was no turning back now. So we decided to give "Taupe" a try. It was still a neutral just slightly darker. We knew there was no way it would match the wall color.
 |


You can kind of see the pink tint in the second picture. Here is a comparison of the countertop with the color on the box. Not even close.

Well......not so much. No canvas here. But banana yellow? Why yes, of course. After 2 coats of canvas to cover up the taupe, here's what we had.

 |
| You can still see the pink taupe color in the background! Oh, and is that a painted piece of furniture in the garage? I believe it is! |
Now here's the kicker. After trying all of these colors, we decided......to go back with the Cobblestone! I know, I know, all that work to just go back to the original color. But if we hadn't tried all these colors, then you would not have known what they looked like. Right? See, it's all for the good of blogging. :) After 2 coats of Cobblestone, here is the final color!


 |
| Look! That spot that wouldn't cover is gone! I guess it should be gone after several coats of paint. |
I love the color! We still have the Frog Tape on and all that, so look for Part Two to see how it looks without the tape and with all the small appliances and goodies back on the countertop. I will also let you know how the paint is holding up. Thank you to those who eagerly waited for this post!
Friday, September 2, 2011
Pinterest- Good ideas
I don't know if you are on Pinterest or not, but if you are, I'm sure you understand my....hobby :). There are so many great recipes, decorating ideas, photo ideas, and tutorials. I really have to watch the time when I'm on this site because I could spend hours on Pinterest. My Pinterest boards can be found here. It's invitation only (I have no idea why), so if you aren't a member and would like to join, you can list your e-mail address in the comment section below this post, and I will invite you. It's free and so much fun! Here are some genius ideas I have found lately on Pinterest.
What are you pinning on Pinterest? If you're on there, look me up! If you want to be on Pinterest, leave your e-mail address below, and I will send you an invite. Happy Pinning!
 |
| The Suels Store straighteners, curling irons, etc. in magazine organizers. Attach to bathroom cabinet. |
 |
| Adelle: Gift wrapping ideas Wrap gifts with newspaper. Great way to recycle! |
 |
| Thanks Martha Store your sheets in their pillow cases. |
 |
| Southern Living Replace a kitchen drawer with a dowel rod and paper towels. |
 |
| Observando Organize desk cords with large paper clips. |
 |
| Jengrandmorris Photobucket Use a tension rod to hold spray bottles under the sink. I tried this, and it worked great! I just need a skinnier rod. Mine is thicker than this one so it doesn't hold the bottles as well. |
 |
| Re-nest Take some fabric and cover a toilet paper roll insert. Use it to hold cords. You could keep a whole box of these and not worry about the cords getting tangled up. |
Wednesday, August 31, 2011
How to paint furniture
Yes, I have been bitten by the painting bug lately. I just told you about how I painted an antique. Very soon I will be posting about how I painted my kitchen countertops! But for today, I will be showing you how I painted our entryway furniture. Here is what we're starting with!
We use this area for lots of things. The top 2 baskets belong to Adam and I. They house the things we need as we are walking out the door. Obviously some other things got thrown in there as well. The baskets on the second row belong to Heidi and the bills. Heidi's basket has her harness, leash, bathing wipes (scented wipes for when she needs to freshen up but not a bath), and grocery bags for when we pick up her poop on walks. Yes, we are polite neighbors. The bills' basket has....bills. AND....an organized binder where I keep track of our bank and credit card statements. They are organized by month. So at least that's organized! The bottom basket houses newspapers that I have not cut the coupons out of yet. I hope to start couponing soon! Anyway, sorry for the "SQUIRREL!" moment.
Once again, I used my favorite primer that requires NO SANDING, NO MATTER WHAT. I love it.
 This piece of furniture was difficult to paint because the sides of it have lots of different angles.
I also had to paint the top of the underside of the shelves because when you sit on the couch in the living room, you can see that part. I felt like Michaelangelo. After 2 coats of primer, it looked like this!
Then it was time for the top coat. I used my trusty Rustoleum Painter's Touch paint that I also used on my antique table. I used 1 coat on the whole piece and about 3 coats on the very top just so it would be nice and wipeable.
 After letting the furniture dry completely in the garage for several days....ok, a week because I got distracted...it was finally time to bring it inside! I cleaned out all of the baskets and put back in what we actually needed when we headed out the door. Are you ready for this?
I think this has been my favorite project so far. I really didn't like this piece of furniture before and was thinking about replacing it. But a coat of paint was all it needed! I love it! Before and After?

 |
| I thought the messiness added to the "before." :) |
Once again, I used my favorite primer that requires NO SANDING, NO MATTER WHAT. I love it.
 |
| Here's what we're working with. |
I also had to paint the top of the underside of the shelves because when you sit on the couch in the living room, you can see that part. I felt like Michaelangelo. After 2 coats of primer, it looked like this!
 |
| So much brighter! |
 |
| I love it!!! It really brightens up the entry area, and it looks so beachy with the natural wood and white two tone look! |
 |
| Details! The picture was made on our honeymoon at dinner. The basket is for putting our keys as we come in the door. And the shell is not sentimental. Just adds to the beachy look! |

What do you think? Is there anything you are jumping to slap some paint on?
Tuesday, August 30, 2011
Saving Moolah: Target Style
Today I went shopping at one of my favorite clothing stores....Target! I think they have the cutest clothes, but they are usually overpriced. So I skipped all those neat and organized racks and headed straight to the clearance section. If you are not friends with the clearance section, you should be. Clearance and I go way back. Here are some great deals I got today!


If you are keeping score, you figured out that if I had paid full price for all of this, my subtotal would have been $90.96. I would never pay that much. Ever. But since I bought these items on clearance, I only paid........ $27.70. That's an awesome deal! For you brainiacs out there, that's a 70% savings overall. What kind of clothing deals have you found lately? Do you like to shop clearance?
 |
| This olive wrap skirt was originally $14.99. I paid $3.74. |
 |
| These bermuda shorts (described as mid waist and straight hip) were originally $19.99. I paid $9.98. |

 |
| This really cute cardigan was originally $24.99. I paid $6.24. |

 |
| These tank tops are really comfy and stretchy. They'll go nicely underneath cardigans. They were originally $9.00 each. I paid....$2.25 each. |
 |
| This white shirt with orange stripes would look great under a royal or navy blue cardigan (or even a gray one). It was originally $12.99, but I paid $3.24. |
Monday, August 29, 2011
How to Paint an Antique
Going into this project, I was VERY nervous. Like terrified. I almost cried over it. Almost. I had been wanting to spruce up this piece of furniture ever since we inherited it from Adam's grandfather. It is a lyre table. I didn't know it was called that, but my mom told me. It has a beautiful marble top with wooden legs and details. It was a gorgeous piece all by itself, but I am just not into the two tone look. Adam reassured me that is was ok to redo this piece. He said his grandfather would want it to be used.


After much coercing, I decided I could do it. But I was so afraid I was going to ruin it, so I made sure to do my homework first. I read tons of reviews on how to paint furniture. What kept coming up in my searches was this primer by Zinsser.
This primer claimed to cover all surfaces-metal, wood, laminate, plastic, etc. WITHOUT NEEDING SANDING. It doesn't matter if the wood is sealed or has a coating or not. I'll take it. I hate sanding. It sounds wicked boring. So I grabbed a gallon of this from my local Home Depot. I also picked up my top coat of paint that I had seen on a few tutorials.
So I got to work and started painting. I used even strokes and a light hand. I made sure not to use too much paint on the brush, otherwise the paint would get globby and drippy. I also made sure not to have to little paint on the brush, otherwise it would look streaky. After a 2 coats of primer, it looked like this.
After the 2 coats of primer, the surface was completely covered. I only used 1 coat of paint over that since I didn't need any more coverage and just needed a little bit of a glossier finish. I'm not sure where this table will end up, but for now I have it in the kitchen to display decorations. We love it! It looks more modern, but still very unique.


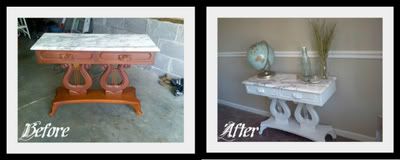


After much coercing, I decided I could do it. But I was so afraid I was going to ruin it, so I made sure to do my homework first. I read tons of reviews on how to paint furniture. What kept coming up in my searches was this primer by Zinsser.
 |
| Thanks, Home Depot! |
 |
| I believe I picked up a gloss finish. Either would be fine. |
 |
| Much brighter! |


A little bit of detail...

 |
| Adam LOVES globes, which is fine with me! I'm liking them too! |

What do you think? Do you dare to paint an antique?
Subscribe to:
Posts (Atom)